前不久通过GitHub的education优惠获得了digitalocean的50刀优惠,买了一个10美元一个月的方案.
大概和linode配置差不多,速度也没差别.

下面说一下拿到手之后应该做什么,(一切基于centos7)
首先要关闭firewalld
systemctl stop firewalld.service
systemctl mask firewalld
systemctl disable firewalld.service
下载iptables并启用
yum -y install iptables-services
systemctl restart iptables.service
systemctl enable iptables.service
接着要禁用ssh以root帐户登陆以及修改端口,
先创建一个用户并修改其密码
useradd username
passwd username接着修改sshd配置文件
vi /etc/ssh/sshd_config
将"#Port 22"修改为"Port port" 例如"Port 9999"
将"#PermitRootLogin yes" 修改为 "PermitRootLogin no"顺带把超时时间改了
找到"#ClientAliveInterval
#ClientAliveCountMax"那两行
改成"ClientAliveInterval 30
ClientAliveCountMax 10"接着修改iptables中关于端口的设置
vi /etc/sysconfig/iptables
把22改成自己的端口service iptables restart
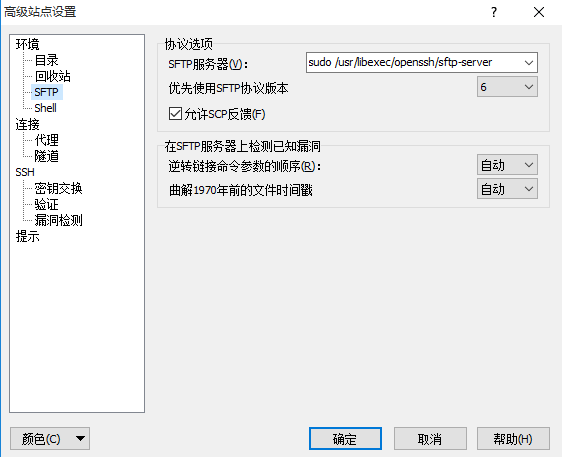
另外,这么做之后如果需要使用winscp,就得设置一下
vi /etc/sudoers
在root那一行下面添加
username ALL=NOPASSWD: /usr/libexec/openssh/sftp-server打开winscp
在高级站点设置中点击SFTP,在SFTP服务器中填写
sudo /usr/libexec/openssh/sftp-server
然后安装lnmp,访问http://lnmp.org/install.html 按照提示做
记得选择php5.6, 同时安装Jemalloc
等待数分钟后,安装memcached以及pureftpd,亦参照说明
接下来安装fail2ban并配置
yum install epel-release //安装epel源
yum install fail2ban
配置
vi /etc/fail2ban/jail.conf
在[selinux-ssh]的下方添加
[ssh-iptables]
enabled = true
filter = sshd
action = iptables[name=SSH, port=1997, protocol=tcp]
#sendmail-whois[name=SSH, dest=you@mail.com, sender=fail2ban@mail.com]
logpath = /var/log/secure
maxretry = 5
在[pure-ftpd]下方添加
[pure-ftpd-iptables]
enabled = true
filter = pure-ftpd
action = iptables[name=PureFtpd, port=ftp, protocol=tcp]
#sendmail-whois[name=PureFtpd, dest=my@vpsma.com]
logpath = /var/log/messages
maxretry = 5
然后重启fail2ban服务,最好系统也重启一下
service fail2ban restart
reboot

“今天我在食堂要了一份红枣粥,看盆里有好多红枣,结果碗里一个都没有!”
“正常,习惯就好……”
“我不甘心,找打饭的理论,你猜她说什么?”
“什么?”
“她说,打给你,后面的人就没得看了……”